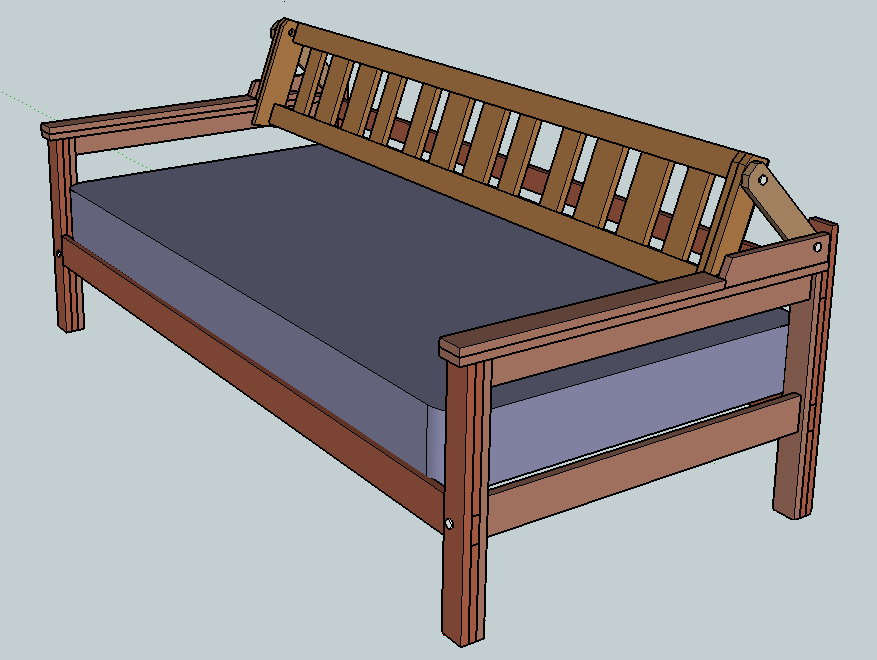
Daybeds need a backrest if you really want to use them as a couch. Leaning back against a pile of pillows, or sitting with your legs strait out leaves a lot to be desired.

This daybed has a backrest that flips forward about 12 inches, creating a normal seating depth for a couch.

The whole thing disassembles similar to the Classic Daybed, using bolts, although it requires additional bolts for the backrest.
The six main sections, when stored on end, take up less than 3 square feet of floor space in storage (less than a twin mattress standing on end).

For this build, I used a biscuit joiner to make the backrest, although a Kreg jig would work just as well. If you don’t have either of those tools, you could replace each 2×3 with a 1×3 and 1×4 laminated together, giving you a ledge to attach the vertical pieces.
Tools Required
Drill, various bits including a 7/8″ bore
Miter saw
Either a Kreg jig, or a biscuit joiner & bar clamps
Shopping List
10 – 1×3 x 8′
9 – 1×4 x 8′
2 – 2×3 x 8′
6 – 5/16 x 3″ carriage bolts
4 – 5/16 x 2″ hex bolts
6 – 5/16 nuts
4 – 5/16 lock nuts
18 – 5/16 washers
2″ screws
1 1/4″ screws
finish nails
Cut List
2 – 2×3 @ 73 3/8″ backrest
3 – 1×3 @ 80″ support rails
2 – 1×3 @ 39.5″ arms
2 – 1×3 @ 35″ arm supports
2 – 1×3 @ 27″ arm top
2 – 1×3 @ 27.5″ legs
6 – 1×3 @ 23.5″ legs
2 – 1×3 @ 10.5″ backrest support (one end angled 20 degrees)
2 – 1×3 @ 12″ pivot arm (4 corners angled)
2 – 1×3 @ 12.5″ pivot base (one corner angled)
2 – 1×3 @ 12.5″ filler
2 – 1×3 @ 10″ filler
4 – 1×3 @ 8.5″ filler
6 – 1×3 @ 8″ back
2 – 1×4 @ 75″ front & back rails
12 – 1×4 @ 38″ slats
2 – 1×4 @ 35″ side rails
2 – 1×4 @ 13.5″ backrest side (one end angled 12 degrees)
6 – 1×4 @ 8″ back
2 – 1×4 @ 1 5/8″ block
Step 1 – Build the front legs
Create the front rail by laminating a 1×4 and 1×3 together. Attach a 1×4 rail (the best looking one) to a 1×3 support rail using glue, and either 1 1/4″ screws, or lots of finish nails. Align the bottom edge, so the 1×4 extends above the 1×3 at the top, and center along the length so the 1×3 extends 2.5″ on each end.

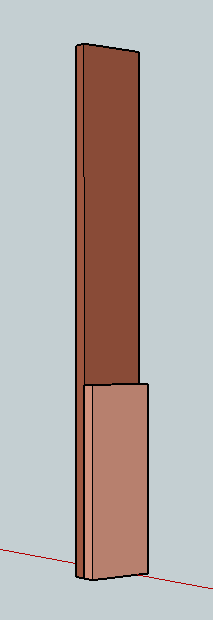
Build 2 front legs, using 2 of the best 23.5″ pieces. Attach one 8.5″ filler to each leg, aligned with one end, using glue and nails. Nail through the filler, so the heads are not visible on the 23.5″ piece.
Attach the main rail to the legs, using glue and 2 screws on each end. (the 8.5″ filler pieces are the bottom end of the leg). Pre-drill the rail, then apply glue, make sure it is square, and screw through it into the leg. Then attach the top filler piece using glue and nails.
Step 2 – Build the back legs
Laminate the back support rail the same as the front, with one 1×4 and one 1×3 aligned on one edge, and centered between the ends.
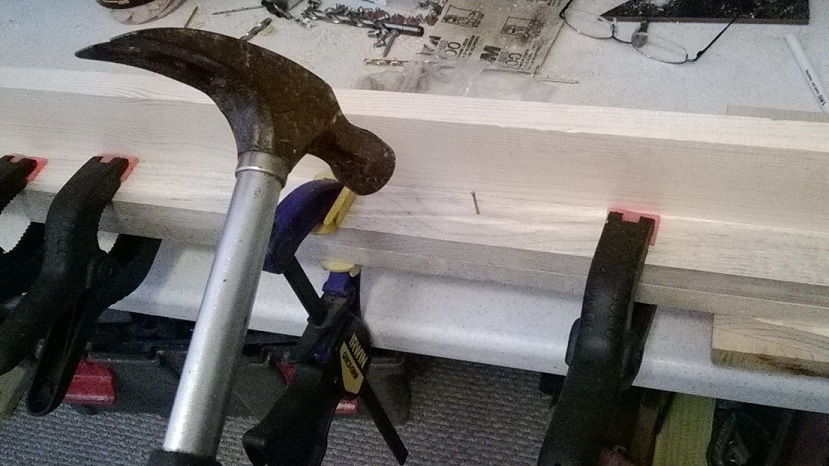
Attach the other 8.5″ filler pieces to the back legs, aligned at the bottom. Attach the back rail to the legs similar to the front, flush against the filler piece. In order to keep everything square, you may want to initially insert one screw at each end, then align the top rail to ensure that the legs are the proper distance apart at the top. With a clamp holding the top rail in place, insert the second screw in end end of the bottom rail.
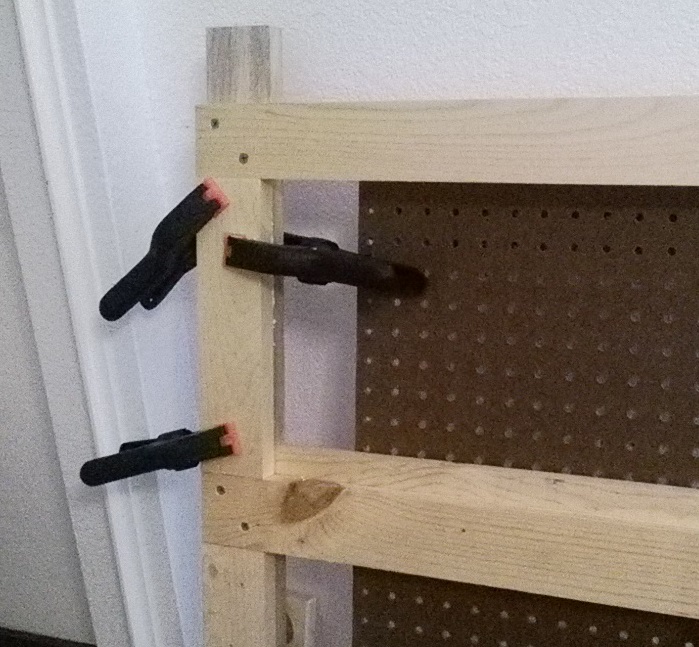
In this photo, you can see that I already screwed the top rail into place, and have the clamps holding the upper filler piece that has just been glued into place. The filler piece was already clamped into place when I aligned and screwed in the top rail.
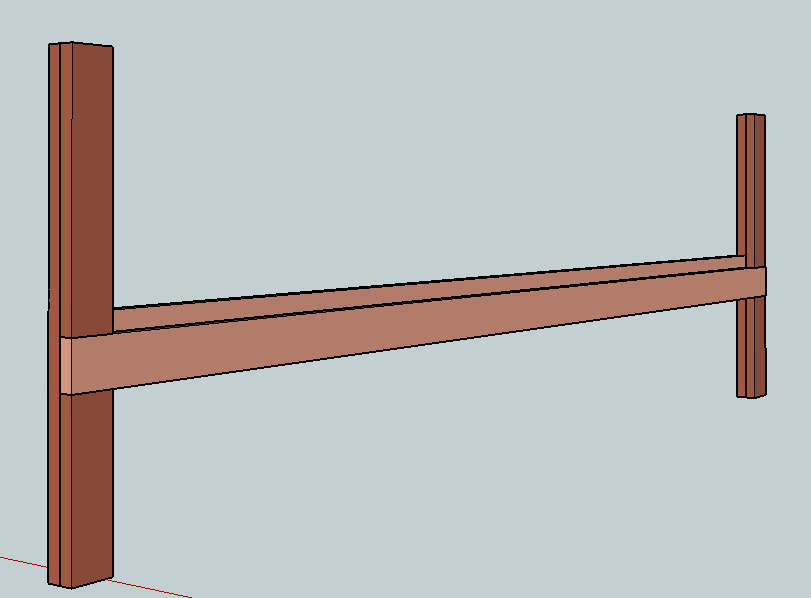
Step 3 – Build the ends
Pre-drill the remaining 23.5″ legs with 2 holes each, 3/4″ from the edge, at 9.25″ and 11.25″ from the bottom. Drill two more, the same 3/4″ from the edge, but at 3/4″ and 1 3/4″ from the top. If you countersink for the screw heads, note that two of legs should be arranged with the holes closer to the left edge, with the holes on other two legs closer to the right edge.
Attach a 35″ 1×4 between two legs with glue and 2″ screws, with the top edge 12″ from the bottom of the legs, and 3/8″ in from the edge. Note: having properly squared ends on the 1×4 will help keep the whole thing square (don’t trust the factory cut to be perfectly square).
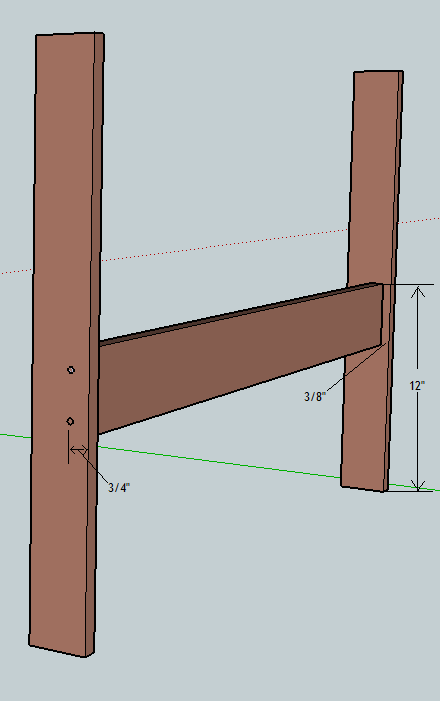
In this image, you can see that I have clamped a 3/8″ piece of scrap to the end rail to help me align the leg.

Now install a 35″ 1×3 between the legs, with the top edge aligned with the top of the legs, also set 3/8″ in from the edge. Use glue and screws.

Step 4 – Build the armrests
The main armrest pieces need the pivot base connected before they are attached to the end pieces.
The pivot base pieces have one corner angled at 20 degrees, and one 5/16″ bolt hole. One one end, mark 3/4″ from the end, and 1.75″ across the end, and draw a cut line. This should be approximately 20 degrees. This corner represents the front, top.
The bolt hole should be 1 5/8″ from the back, and 1 5/8″ from the bottom.
Drill the arm piece for screws for the pivot base. Drill 2 holes for the pivot base 1/2″ from the edge of the arm at 1″ and 11″ from the back.

This is one spot where you may need to pre-drill into the second piece of wood. In most cases, you drill the top piece, and force the screw into the underlying piece. But in this case, you are going into the edge grain of the pivot base very near the end of the board. When I first did this without first drilling through into the second piece, the wood started to split.
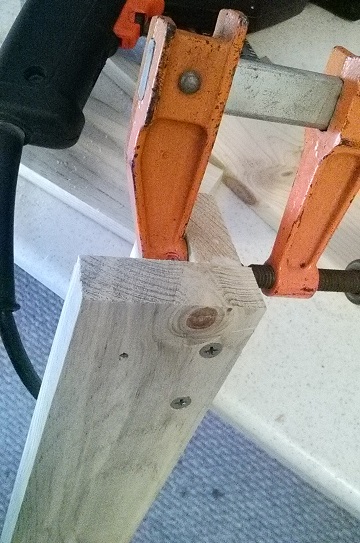
So I stopped, removed the screw, added a dab of glue to the split, and applied the clamp to squish the board back together. I then proceeded with pre-drilling an appropriate depth, and put the screw back in. You can also see in this photo that I added another screw about 2 inches away.

The pivot base will align with the back of the armrest, 1/8″ from the edge. Note that the left and right armrests are mirror images of each other, so the pivot piece aligns with the opposite edge. Make sure that one is aligned on the left, and the other is aligned on the right, when viewed from the front.

The armrest can be attached to the end frame with glue and either nails or screws. If you use screws, pre-drill 3 holes. The first is 2 5/8″ from the front, centered across the width. The next is 18″ from the front, 3/4″ from the outside edge (same edge the pivot piece is close to). The third hole is 1 1/8″ from the back, centered across the width.

Install armrests on each end piece, matching the outside alignment of the arm with the end piece. Each arm extends 3/4″ beyond the frame in the back, and 2.25″ in the front.
Step 5 – Pre-assemble & Drill
Clamp the 4 main pieces together in their final configuration. You will drill 6 bolt holes with everything clamped together, plus it is recommended to drill 2 more for pegs to keep the front legs aligned. The bolt holes should be 5/16″, and the pegs 1/4″.

The lower bolt holes should be 9.75″ from the bottom, and 1.5″ from the outside edge (1″ from the inside edge). Drill the first hole, then insert a bolt, then move on to the next hole.

Then, drill a 1/4″ hole down through the armrest into the top of the front leg. Go about 1/2″ deep into the top of the leg (note that the top of the armrest will be covered in a later step, so this hole will not be visible). This hole will be used for a dowel peg, but don’t glue in the peg while it is assembled.
Step 6 – Build the Backrest
The backrest consists of a bunch of short verticals connected between the two 2x3s. In the photos, there are 9 verticals, but in the plans I bumped it up to 12 to eliminate the bigger gaps, so you can get away with flimsier back pillows.

Using the biscuit joiner, I glued all the verticals in place, and clamped the top and bottom rail together with bar clamps. After that dried, I screwed on the end pieces.
The centerlines of the verticals can be marked on the 2x3s at
5 1/4, 10 5/8, 16 1/2, 21 7/8
28 3/8, 33 3/4, 39 5/8, 45
51 1/2, 56 7/8, 62 3/4, 68 1/8
That puts them in 3 groups of 4, with each group consisting of a x3, x4, x4, and x3.
If you prefer to mark the edge of each vertical rather than the centerline, puts your marks at
4, 8 7/8, 14 3/4, 20 5/8
27 1/8, 32, 37 7/8, 43 3/4
50 1/4, 55 1/8, 61, 66 7/8
If you are using the Kreg jig, you could choose to connect the end pieces to the 2x3s first, then slide in the verticals and screw them down. The ultimate goal is to get it as square as possible.
In either case, pre-drill the side pieces for 2 screws each for both the upper and lower back rails. Also bore a 7/8″ hole in each side piece centered at 1.5″ from the top, and 1.5″ from the front edge.

The back rails will align with the short edge of the side piece, about 1/8″ from the edge. Use 2″ screws into the ends of the back rails.

The back support pieces should be drilled for the pivot bolt holes. Drill a 5/16″ hole at 1.5″ from the top, and 1.5″ from the front edge.
Also drill screw holes as shown. These pieces can then be attached to the outside of the side pieces. The top and front edges will be aligned, so the back and bottom edges will be offset.
Step 7 – Drill the pivot arms & Cut the corners
The pivot arms each need 2 holes at 5/16″. All 4 corners should be angled, with 2 corners getting a little more trim, on opposite corners. The final pieces are symmetrical when you rotate them one end to the other, but not when you flip them over.
The holes should be 1 5/16″ from the end, and 1 1/2″ from the edge–measured from the opposite edge for each hole. That should put the distance between the holes at about 9 7/16″, center to center.

The corner closer to the hole should have 1/2″ removed, and the other corner gets 3/4″ cut off (measured from the corner along each edge).
Get the holes as perfectly perpendicular as you can.
Step 8 – Attach the Arm Tops
The top pieces for the arms can be attached after the holes have been drilled for the dowel pegs. Glue and nails should be sufficient. I drove finish nails from the underside so they would not be visible.
The dowel peg can be glued in at the same time. It only needs to extend about 3/8″.

Step 9 – Final Assembly
Assemble the 4 main pieces with the 6 carriage bolts.
Attache the pivot arms to the backrest with the hex bolts and lock nuts. You will need a socket for the countersunk nut. Use 3 washers on each bolt, with one under the head, one between the back frame and pivot arm, and one under the nut.

Then set the backrest in the forward position and allow the pivot arms to rest against the back legs. Insert the other hex bolts using the same 3 washer configuration.
Step 10 – Connect the slats
Lay the slats across the support rails evenly spaced. Lay a couple of strips of burlap or sturdy cloth across the slats and staple into the slats. You will probably want the staples on the bottom when in use, so flip the whole group over when done.

The 2 slats on either end should be secured in place. Drill 4 holes for screws or dowel pegs, into the support rails, just inside either end of the two end slats. The screw of peg should stick up about 1/2″ to hold the slats in place.
It’s a good idea to do most of your sanding with the bed assembled, then take it apart for staining or painting. As you take it apart, mark large letters on the inside surfaces of the legs that are pressed together when assembled. This will remind you to avoid painting those surfaces, and will be helpful every time it is reassembled.
You can download the SketchUp file for a better view.
This is a really nice piece of furniture. Thanks for sharing. I joined that 16,000 plans and got ripped off myself. All I got was some ridiculous out dated plans that people couldn’t even be proud to own.
Hey can someone tell me how to build a nice concrete or brick incinerator for the backyard for burning the weekly trash. I need one really well and would be happy too pay for the plans.
Hi
Could you please expiate a bit more ins hoping list section. 10 – 1×3 x 8′ means
10 of 1×3 inches by 8′? is it feet.
Sorry I am new at this.
What thickness of mattress is this designed for?
Are the dimensions more geared towards a thick12″ mattress? Or would a 6″ outdoor mattress work fine?
With a conceptual viewpoint, issuing your company’s gives you on an fairness crowdfunding system is going
to be much like an IPO. You should know your company’s write about
price, which is derived from your company’s valuation.
Je pense que tout le monde devrait lire ça. C’est un must-read.